How to fix Sky Q connectivity problems for good
How to fix Sky Q connectivity issues: Sky Q is, hands down, the best premium TV service you can buy. With the addition of Sky Q Mini boxes around the house, you can get all of your content around the house.
It’s brilliant when it works but a nightmare when the connection is intermittent. Having had issues myself, I can take you through all of the options I’ve tried to get the issue sorted, both that I could take myself and with Sky’s help.
If you’re having trouble, here’s how to fix Sky Q connectivity problems.
Related: Sky Q review
Why you get Sky Q connectivity problems
For convenience, Sky Q communicates via its own proprietary wireless mesh network. This was done in the days before mesh networks were common, with the idea that Sky could control the whole system. It was a good call when Sky Q launched, but today it would make more sense if you could piggyback your Sky boxes onto your home network. Sadly, while you can force a Mini box to join your home wireless network it can only do so on the 2.4GHz band, which isn’t fast enough for streaming live TV, so don’t do this.
As it stands, the only way to use wireless is to use the Sky Q wireless mesh as set up during installation. This has both a 2.4GHz and a 5GHz network. In most cases, the 2.4GHz network is used to provide a wireless hotspot if you have Sky broadband, but it can also be used for TV data sent to the Mini boxes. Actual streaming takes place over the 5GHz network, as this has the required bandwidth.
In most cases, then, if you get connectivity problems on a Sky Q Mini box, it’s because of interference on the 5GHz network, although 2.4GHz interference can cause problems. Knowing that, the answer to the problem is to avoid interference. Here are the steps you can take.
Related: Sky Q tips, tricks and secrets
Change your router’s Wi-Fi channel
One of the main sources of interference is your Wi-Fi router. Although the 5GHz band isn’t very congested, there can still be issues and, as I mentioned, it’s possible that 2.4GHz interference is causing problems.
To change your router’s wireless channel you’ll have to connect to its web-based management interface using a browser (check your router’s manual to find out how). Then, go to the wireless settings and change the channel used by the 2.4GHz network: 1, 6 and 11 are the best choices. Change the channel used by the 5GHz network; as Sky Q defaults to using Channel 36, anything but this is a good choice.
Once your changes have been made, you should restart your Sky Q equipment: take the power cable out of each device, then plug them back in starting with the main Sky Q box first, followed by the Sky Q mini boxes.
Change the Sky Q channel
You can also change the 5GHz channel that Sky Q uses, although this option cuts the available bandwidth in half. To do this, go to any Sky Q box and press the Home button. Scroll down to Settings but don’t press anything. Instead, type 001, then press Select. This brings up the hidden engineer’s system menu. Go to Network, and then you can change the 5GHz Wi-Fi channel width, selecting from: 80MHz / ch36 (default); 40MHz / ch. 36; and40Mhz / ch.44. It’s worth trying all three to see if it makes a difference.

As you can see, the latter two options use 40MHz channel width, which is effectively half the bandwidth of the 80MHz default. This reduces the chance of interference, though, so it might work for you.
Related: Common Sky Q problems and how to fix them
Get a Sky Q Booster
If this doesn’t fix your problem, then you can phone Sky and talk to them about getting a Sky Q booster. Much like an additional satellite in a mesh system, a Sky Q booster gives another repeater in the system. Sky Q boosters can be installed wirelessly, and a Sky Q engineer will try and place the booster as close to the problem Sky Q Mini box as possible. This may well fix your problems, but it’s not guaranteed. You should change the Sky Q channel back to the default setting beforehand.
Use Ethernet instead
Alternatively, you can try and use Ethernet instead. It’s best to use Ethernet on the whole system but this isn’t always possible, so you can just wire in the boxes you’re having problems with. I recommend that you start with the main box and wire that in, as you’ll also increase download speeds. This is assuming that your main box is within easy Ethernet reach of your router.
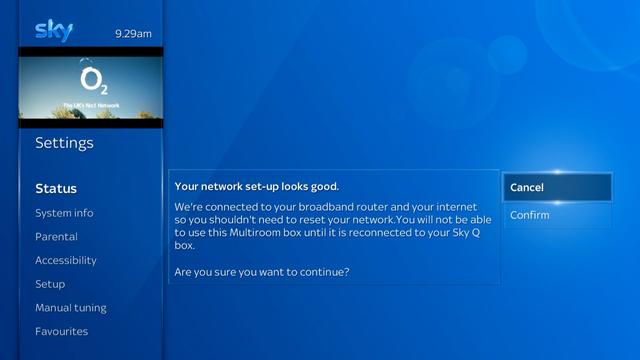
If it is, power on the box, then go to Settings, Network connection, Network setup. Then, select Reset and wait while your internet connection is checked. Once done, select Confirm to reset your network and your Sky Q box will show a Resetting message on the screen.
Once done, plug in an Ethernet cable from your router into the Ethernet port on the back of the Sky Q box (it’s covered by a label that you can peel off). On your Sky Q box select Connect to your router using a wired connection. Your Sky Q box will then get a new IP address from your router and connect to the internet.
This process gives your Sky Q box a new network name, so you now need to reconnect your Mini boxes. This can be done using wireless or using a wired connection. I’d say to go for a wired connection where you’ve had problems and stick with wireless for Mini boxes that have been working fine.
Given the location of Mini boxes, getting an Ethernet cable to them isn’t always that easy and you should avoid Powerline networking, as it generally isn’t fast enough. Wireless mesh systems can come to your rescue, as you can plug a Mini box into the Ethernet port on the back of a mesh satellite. This is what I’ve done at home with a Netgear Orbi system: the Orbi is way faster than Sky’s network and gives plenty of bandwidth.
Related: Best wireless router
Once you’ve got Ethernet into the back of a Mini box, turn that box on and go to Settings, Network connection, Network setup, then hit Reset. Wait for the system to check your connection, then click Confirm.
Once done, you’ll see a screen that says Step 1 of 4 and has information on how to connect your Mini box to your Sky Q system. This should only appear for a few seconds, as the Mini box will detect the Ethernet connection and will find your Sky Q box on your network automatically.
For Sky Q Mini boxes where you want to stay wireless, follow the reset instruction above. When you get the ‘Step 1 of 4 screen’, press Select on your remote control. Then, move to your Sky Q main box and press the WPS button on the front (the one with two arrows) until the light flashes. This will let your Sky Q Mini box join your Sky mesh network.
If you have a Sky Q Booster, you’ll need to reset that one, too. For the older booster, which looks like a white Sky Q Mini box, press and hold a paperclip in the Booster’s reset switch at the back until the power light starts flashing. For the new booster, press and hold the Reset button at the back until the power light starts to flash.
On both boxes, when the wireless light comes on solid green, press and hold the WPS button on your main Sky Q box until it flashes. Press and hold the Booster’s WPS button until it flashes, then after a few minutes your Booster box will have rejoined the network.
Related: Essential Sky Q tips, tricks and secrets
Disable Wi-Fi for good
If you go for an all-Ethernet option, with no wireless components, then you can disable Sky’s Wi-Fi for good. This will stop your Sky system interfering with your Wi-Fi. First, unplug and remove any Booster boxes you have. Next, on each Sky box (main and Mini), press Home and move down to Setting but don’t press anything. Type 001 and hit Select. In the menu that appears you can go to Networking and turn off 2.4GHz networking and 5GHz networking.
You should now have a rock-solid Sky Q system running entirely on Ethernet. You can unplug and remove any boosters that you had, too. And that is how you fix Sky Q connectivity issues.