How to group lights in HomeKit
Apple Home and HomeKit are great ways to control all of your compatible devices in one place. There’s one little issue: devices all come in individually into the app, including each and every smart bulb. Here, I’ll show you how to group lights in HomeKit for easier control.
For this tutorial to work, you need to have HomeKit compatible smart lights, such as the Philips Hue range. Your lights need to be available in the Home app and I’ll assume that your lights are already in the correct rooms.
1. Create a new group
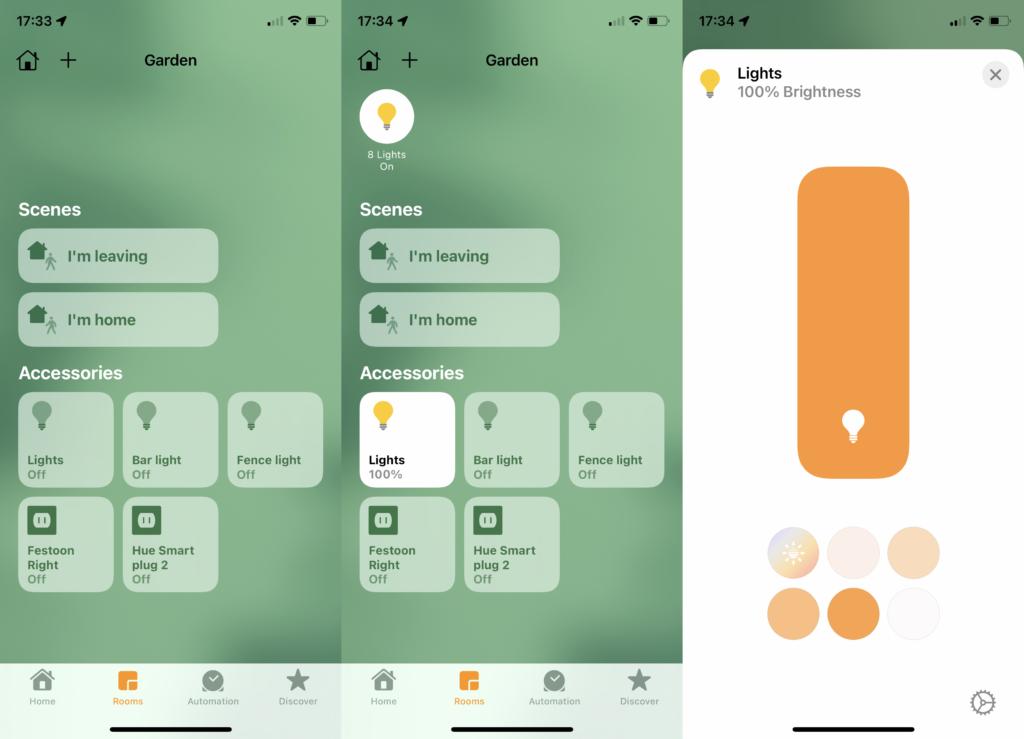
Open up the Home app and go to a room. Here, you’ll see a set of lights, with each one individually controllable. That makes turning lights on and off and setting colours a pain, so it’s easier to group them together.

To do this, long-press any light, then tap the Settings cog. Scroll down and select the Group with Other Accessories link. This will take you a list of compatible devices, so select all of the other bulbs that you want to group together. Type in a group name at the top of the dialog box and then tap Done.
Note that you can only group devices of the same type together. For example, if you have smart plugs that control lights, they can’t be grouped together with smart bulbs, which is a little annoying.
2. Control your group
Go back to the same room and you’ll see that you’ve now got an icon for Lights. Tap this to toggle all of your grouped lights on and off. Press and hold the icon and you can change the brightness, temperature or colour of all of the lights at the same time.
If you have a HomePod Mini in the same room, you can command your lights without saying which room they’re in: “Hey Siri, turn on lights” or “Hey Siri, set lights to red”.
3. Add new devices to the group
If you get new devices and want to add them to the group, you can do this. Press and hold your lighting group, then tap the settings cog. Tap Accessories and you’ll see which devices are in the group: you can control individual devices here. Tap Edit and you’ll see a list of compatible devices. You can add new devices to the group by tapping them, or you can remove existing items from the group by deselecting them.
You might like…
Apple HomePod Mini Review
David Ludlow1 year agoApple Home and HomeKit Review
David Ludlow3 years ago4. Get rid of a group
To get rid of a group completely, long-press it, then tap the settings cog. Scroll to the bottom of the screen and select Ungroup Accessories. Tap Ungroup to confirm, and your devices will all appear individually in the Home app.