Ask the Builder: How to fix a clogged toilet with a bucket of water instead of a plunger
Q: Tim, I was really grossed out this past weekend. A toilet clogged in our home and while using a normal plunger some of the nasty water squirted up on me. It was horrible. Then you have to clean the yucky plunger. Ick! Is there a safer and more sanitary way to unclog a toilet? – Becky, Scottsdale, Ariz.
A: Everybody’s had to deal with a clogged toilet before, and that splash back is pretty nasty. I’ve got good news. There’s an easy and fast way to unclog a toilet that doesn’t involve using the black bulb of nastiness in the toilet bowl.
I’ve been a master plumber since age 29. I’m naturally inquisitive and I thoroughly enjoyed both my high school and college physics classes.
Years ago, as a young man, I noticed two things about toilet clogs. The first was that when a clog happened and you flushed the toilet, the water would rise up to the top of the bowl and sometimes overflow. Talk about a gross mess! I discovered how to quickly take off the lid of the tank and lower the flapper valve to stop the flow of most of the water into the tank to minimize the flood.
But then I noticed often after a few minutes or even an hour, the water level in the bowl would drop back down to normal. That meant some water was leaking past the clog. I thought about these things and decided to experiment. I remembered a simple formula from my physics classes: Force equals mass times acceleration
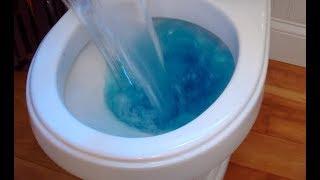
My thought was to dump the heavy water as fast as possible into a toilet bowl. This would produce a large force to free the clog. I filled a smaller bucket with water, perhaps two gallons, and poured it as fast as I could into the clogged toilet bowl without splashing it all over the place.
It’s important to realize I aimed the column of water from the bucket directly at the bottom of the bowl where you see the toilet colon passageway disappear. The water level in the bowl started to rise and just before it was to overflow the rim of the bowl, the toilet flushed on its own. The rush of heavy water from the bucket cleared the clog!

This method doesn’t always work the first time, but I started to notice the water level in the bowl would lower faster. This meant more water was passing the clog faster, which meant I was making progress. I’ve even used this same method in hotel rooms using the waste can in the bathroom as my bucket.
I taped a quick video showing exactly how I unclog toilets with a bucket of water. You can go to my AsktheBuilder website to watch it. Just go to: go.askthebuilder.com/toilet
Q: Is it still possible to do real whitewashing like I remember reading in “The Adventures of Tom Sawyer”? I want to whitewash my interior brick fireplace that has the horrible ’80s look. Do they still make real whitewash? Can you tint it a color? I see cable TV shows where people are adding water to paint to make whitewash. Is this the best way to do it? – Rachael, Knoxville, Tenn.
A: Don’t be fooled by watching those home improvement cable TV shows. Beware of the information on some of them, as it’s just not right. Thinned paint is not whitewash. If you add too much water to paint, you thin down the glue that allows paint to stick to something. It’s a horrible idea and all those promoting substituting paints for real whitewash should be lashed with a wet fettuccine noodle!
Whitewash is a simple mixture of lime, salt and water. Whitewash, once mixed, is liquid rock. When you apply it to a clean surface and it cures, it’s far more durable than paint. Whitewash can last for many decades.
The good news is you can still purchase hydrated lime in bags. It’s very inexpensive. Salt is also a cheap commodity. Better yet, you can colorize whitewash using dried pigments that are also easy to get. Stamped concrete installers use these dry-shake pigments all the time to add color to concrete.
I whitewashed a huge room addition decades ago to match a 1920s brick house that had the original whitewash on it. The original coating was dirty, and the owner loved that look. I mixed black and brown pigments in different batches to get exact matches with those aged sections of the house.
I’ve got step-by-step photos of whitewashing a brick fireplace at my AsktheBuilder website. The recipe I used is also there, as well as sources of the dry pigments. I’ve also got some great tips for the first-time whitewasher. Go to: go.askthebuilder.com/whitewash
(Awesome Tagline: Tim Carter can call you on the phone for FREE to solve your problem. Go to his website and fill out the form on this page: www.askthebuilder.com/ask-tim/.)