STONE TFT LCD for weather station
The company recently needs to develop a project that focuses on real-time monitoring of the surrounding environment.
I need to buy some components to do pre-project testing.
Components:1. Programmable screen2. Microprocessor3. Photo resistor sensor
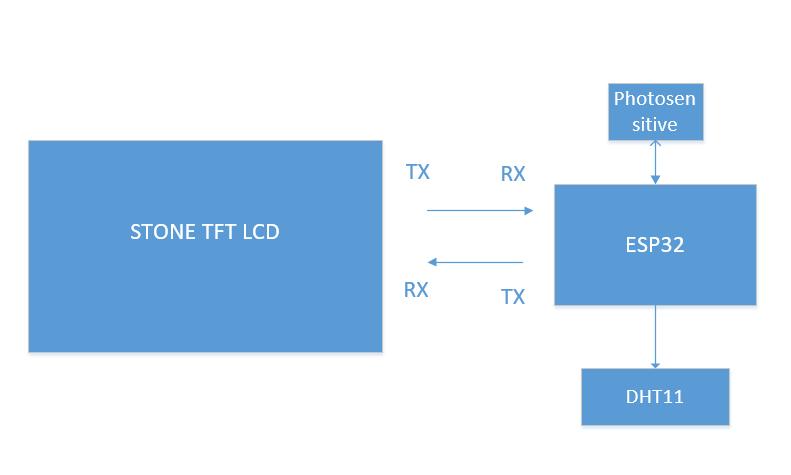
Here is the schematic of my working project:
This application function is divided into three parts:1. Temperature monitoring2. Humidity monitoring3. Light monitoring
Result:
After numerous research, I finally settled on the following model products:
Related devices:1. DHT11 * 12. Photo resistor sensor * 13. Dupont wire * 84. Arduino module * 15. STONE TFT LCD screen *1
STONE TFT LCD and Arduino information interaction.
Arduino peripheral control.
This is thewiring diagram:
Module Introduction
Temperature and humidity sensorThe DHT11 is an all-in-one temperature and humidity digital sensor that includes an internal resistive moisture measurement element and an NTC temperature measurement element and is connected to a high performance 8-bit micro-controller.
A simple external circuit connection is all that is needed to collect local temperature and humidity in real time. the DHT11 communicates with controllers such as micro-controllers using a simple single bus, requiring only one I/O port.
The sensor internal temperature and humidity data 40Bit is transmitted to the micro-controller at once, and the data is checked by means of checksum, which effectively ensures the accuracy of data transmission.
Photosensitive sensorsOne of the most common sensors, photosensitive sensors come in a wide variety of types: phototubes, photomultiplier tubes, photo resistors, phototransistors, solar cells, infrared sensors, ultraviolet sensors, fiber optic photoelectric sensors, color sensors, CCD and CMOS image sensors, etc.
The simplest photosensitive sensor is a photo resistor, which generates an electric current when a photon strikes the joint.
Arduino
The Arduino Uno is an ATmega328P based micro-controller board. It has 14 digital input/output pins (6 of which can be used as PWM outputs), 6 analog inputs, a 16MHz ceramic resonator (CSTCE16M0V53-R0), a USB connection, a power socket, an ICSP header, and a reset button.
It contains everything you need to support your micro-controller; just connect it to your computer with a USB cable or power it with an AC adapter or battery to get started.
You can tinker with your Uno without worrying too much about doing anything wrong, and at worst you can spend a few dollars to replace the chip and start over.
STVA101WT-01 serial screen
STVA101WT-01 display module is communicated with MCU through serial port, which is needed in this project.
We just need to add the designed UI images through menu bar options for buttons, text boxes, background images, and page logic through the host computer, then generate the configuration file, and finally download it into the display and it is ready to run.
The data sheet can be downloaded via the official website at https://www.stoneitech.com/support/download
Design and production
Arduino

STONE tool box interface design
Once downloaded, the tool is free to install, so you can put it anywhere on your hard drive and double-click it to run it.
Select New Project, set the screen size to 1024*600, set the project name to weather, and finally select the path where the project needs to be saved, then click OK.
Find the Picture file directory, right click and select Add, and select the desired picture in the pop-up window.
First add a button control to the temperature, select “button” control, and draw the corresponding area; then in the right feature settings, set the button effect, here select page 2, that is, when the button is pressed, the corresponding area to display the effect of page 2; then select the page switch function, here select the No. 4 page, that is, when this button is pressed, the page will immediately switch to page 4, that is, the temperature display interface.
Under the temperature display interface, a text display control is needed to display the real-time temperature data passed by the Arduino, so it is necessary to add a data variable control, as shown in the following figure.
First of all, you need to set the variable address of the control, this address is very important, the data of the micro-controller can only be displayed by sending data to this address, and then set the format of the display, here choose 2 integers and 1 decimal.
If you feel that the font size of the display is too small to see clearly, you can also adjust the font size, and finally the alignment, I generally choose the center alignment, of course, there are also left-aligned, right-aligned to choose.
The STONE TFT LCD sometimes needs to control the micro-controller to achieve a two-way interaction, which is also the case here, and needs to implement the start and stop acquisition function, using the START button as an example.
Select the “return pressed key value” control, which is different from “button” and can send key values to the micro-controller so that the micro-controller can respond.
First set the key effect, here select page 2, when the key is pressed it will display the effect of page 2, here there is no need to switch pages, so select null, it should be noted that it is also necessary to set a variable address.
This variable address can not be repeated, otherwise it may appear invalid, here the variable address is set to 0x000A, also need a key value, set to 0x0002 This value will also be sent down as the key is pressed.
After setting, click compile, then insert the U disk, wait for the recognition to finish and click download to copy the project into the U disk, and plug in the display to upgrade. In this way, the whole project is finished.
For reference, here is the code:
int lightState = 0;bool TemperatureBool = false;bool HumidityBool = false;bool illuminationBool = false;bool illuminationState = false;
uint8_t TemperatureValueInteger = 0;uint8_t TemperatureValueDecimal = 0;uint8_t TemperatureValue = 0;
uint8_t HumidityValue = 0;uint8_t illuminationValue = 0;
uint8_t TemperatureOutput[8] = {0xA5, 0x5A, 0x05, 0x82, 0x00, 0x10, 0x00, 0x00}; //A5 5A 06 83 00 0A 01 00 02uint8_t HumidityOutput[8] = {0xA5, 0x5A, 0x05, 0x82, 0x00, 0x15, 0x00, 0x00}; //A5 5A 06 83 00 14 01 00 05uint8_t illuminationOutput[8] = {0xA5, 0x5A, 0x05, 0x82, 0x00, 0x20, 0x00, 0x00}; //A5 5A 06 83 00 18 01 00 08uint32_t cout_i;uint8_t RecievedTemp[40];
#include “dht11.h”dht11 DHT;#define DHT11_PIN 5#define PIN_A 3
void setup() {
Serial.begin(115200);
}
void loop() {
DHT.read(DHT11_PIN);
if(Serial.available() != 0){for(cout_i = 0; cout_i < 9; cout_i ++){RecievedTemp[cout_i] = Serial.read();}switch(RecievedTemp[5]){case 0x0A://Temperature startTemperatureBool = true;break;case 0x0C://Temperature stopTemperatureBool = false;TemperatureValue = DHT.temperature;TemperatureOutput[7] = TemperatureValue;Serial.write(TemperatureOutput, 8);break;case 0x0E://Temperature backTemperatureBool = false;break;case 0x14://Humidity startHumidityBool = true;break;case 0x16://Humidity stopHumidityBool = false;HumidityValue = DHT.humidity;HumidityOutput[7] = HumidityValue;Serial.write(HumidityOutput, 8);break;case 0x13://Humidity backHumidityBool = false;break;case 0x18://illumination startilluminationBool = true;illuminationState = false;break;case 0x19://illumination stopilluminationBool = false;illuminationValue = analogRead(PIN_A);illuminationOutput[7] = illuminationValue;Serial.write(illuminationOutput, 8);break;case 0x17://illumination backilluminationValue = 0;illuminationBool = false;break;default:break;}}}
Just a simple reminder, if you run into problems with your development, Stone has an official forum where you can ask technology-related questions https://forum.stoneitech.com/
Other reference images
—
Article contributed by Grey Ii.